
This is the 10th post in my series on cool coop builds. I haven’t been looking for the biggest or best, but ones that express the heart and soul of the owners that have interesting back stories and might inspire my readers.
I’m noticing more older folks, women and upcyclers are building their first coops. The results are so much more interesting and satisfying than buying a pre-fab coop or hiring someone to do the work for you. I’m hoping that their stories will inspire others to challenge themselves to do the same.
I am a new chicken and turkey mom, but have had ducks for roughly three years.
My chicken journey came about after my husband brought home turkeys on a whim. He clearly did not do his research on the broad breasted breed so they are now on a lifetime of weight watchers, as he wants to keep them as pets and not harvest them.
I figure if I had to build a new coop, I might as well get chickens. I started with a Starlight Green Egger (affectionately named Dolly after Dolly Parton who is a star) and a Prairie Bluebell Egger (named Reba). Once I could finally find chicks again, I bought Olive Eggers. I bought extra for friends who were having a hard time locating chicks and to trade a friend of mine for chicks they were hatching. I currently have five Olive Eggers. I started with 20 Olive Eggers but many ‘pullets’ ended up being roosters and I had already traded the other chicks. At the same time I got Olive Eggers, I purchased two Sapphire Gems. I named one Sally after my Granny because she is a ‘gem’ and the other ended up being a rooster.
Since then, I purchased two Midnight Blue Eggers. These are all black and lay blue eggs. My friend gifted me three Polish-Silkie mixes. I believe one of those may be a roo. If so, he will be re-homed. I have six straight run Easter Eggers, three French Black Cooper Marans and one Blue Marans. I know for sure one of French BCMs is a rooster, which I plan to keep for flock protection and breeding.
The roosters I have gotten throughout this process have all been re-homed except my Marans.
I have five khaki Campbell ducks, and a Mallard drake that I rescued and raised from a baby. He was abandoned in my uncle’s boat by the mom, probably due to him hatching last and having a foot issue at birth. He functions just fine now and refuses to leave all of his ladies.
I have about 25 chickens, two turkeys and six ducks. I may or may not be losing count of my chickens. I know this seems a bit crazy, but chicken math is a real thing!
I am in no way a professional builder by any means but I was raised to try and do for myself and figure it out, so I have. Prior to building this coop, I built a duck coop, raised garden bed and many projects around the house, such as a workbench, chainsaw bench for my husband, pallet type walls and beams, etc.
The idea really came from my head. I took plans my friend had obtained for her tiny coop from Etsy and just made them bigger in size. Essentially, I used a picture of her coop to figure out an idea of how I wanted my coop to be. Then I searched Pinterest and the experience of others to think of things I’d like to have within the coop such as storage. Having dogs, ducks and now additional poultry, I was looking for ways to keep feed and supplies organized and out of my garage. Adding storage areas to the new coop was the perfect solution!
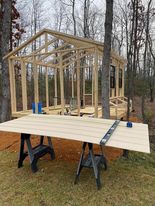
I built the entire coop and run with my own two hands and I am so incredibly proud of that. It actually probably took me longer to build because I was doing it by myself. I did have a day or two of help from my teenage niece and father-in-law but ultimately, it was done with a lot of hard work. Due to the coop being in a low-lying area, my husband did the work of laying down bank run to level the area out. He also helped to dig the holes for the posts to the run.


My only confession would be I had to have someone come in and redo the roof. The negative of doing it myself and being an amateur is the coop itself wasn’t perfectly square. This in turn offset the roof. With my turkeys growing rapidly, I felt the pressure to get it redone quickly and redone right.
The build itself took a little over two months. Had it not been for me wanting to do it myself, it likely could’ve been built quicker.
Eeek….there really was no budget but in all it cost probably $1,000-$2,000 give or take. At this point, I’d rather not even know how much it cost.
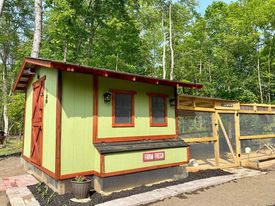
The coop is 10’ x 10 ‘ with a 1’ bump-out for the nesting boxes. The run is roughly 10’ x 27’.
Features
I learned a lot from building the duck coop and the failures of owning poultry. With that said, I think those failures or adjustments were helpful in designing this coop.
- Automatic door with a solar sensor. Honestly, this wasn’t necessary since the run is attached to the coop and it is secure.
- Nesting boxes were made as a bump-out to the actual coop. This is nice because I can access the eggs without having to go into the coop. I created a walkway from pavers to make accessibility even easier.
- Roosting bars were made out of cedar trees my husband cut from our property. Not only is it aesthetically pleasing but its functional and were FREE.
- The forms to hold the posts were made from scrap wood I had during the building process.
- I attached solar lights on the exterior of the coop and the interior of the run mostly for ambience. I don’t have electricity to the coop yet but eventually that may be the goal so I can put a temporary brooder area within the coop.
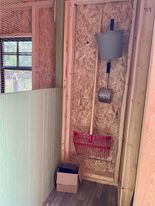
- A 2’ storage area was designed into the coop. This allows for me to house the feed, treats, and First Saturday Lime out of the elements and within easy access.


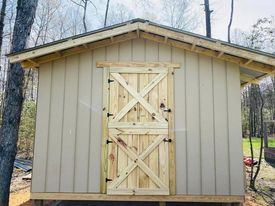
- The Dutch door was a Pinterest-inspired idea and I LOVE THEM! They weren’t overly difficult to make and look beautiful. I love that I can open the top door in the summer for a breeze within the coop. For extra security, there is a secondary door, which has to be opened for access to the coop and chickens.
- I purchased two shed windows from Wal-Mart and installed them for ventilation within the coop. For extra security, I added hardwire cloth over the windows to predator proof it.
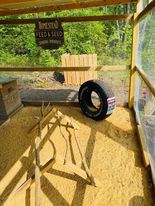
- Sand under the roosting bars and within the run. If you have not utilized sand, you’re missing out! Having sand under the roosting bars is so efficient for cleaning. I built a box to keep the sand contained and am able to scoop the chicken poop like kitty litter, making clean up a breeze. I chose to put sand within the run as well for easy clean up and for better drainage. It is important to note that you want to use construction sand. Fine sand or play sand can negatively impact the chickens if they eat it.
- I didn’t have any extra flooring laying around so went to Lowes and was able to score a large roll of linoleum flooring for about $7. I HIGHLY recommend this, as it also makes clean up super easy and protects the wood. I have found that within the coop area, pellets are best, as they stay dry compared to straw or wood shavings.
- I created a bump-out storage shed on the exterior of the coop using scrap materials. This was not originally planned, but with leftover material, I figured why not? It has actually been extremely helpful because I now have a place to put pellets, extra sand and materials, which won’t be taking, up space within the storage area of the coop.


- Within the run, I made a chicken swing, used wood slices to create a playground and old tires as a play tire (standing upright) and a tire for dustbaths.
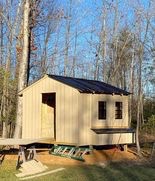
- I lifted the coop 18” off of the ground. I was hesitant to do this because I was worried the chickens would lay eggs under the coop and I would have a hard time accessing them. The chickens LOVE it because they are nosey and can see us better. Additionally, it has created shade and so much more space for them to roam.
- The entire coop and run is covered in hardwire cloth with metal roofing. The hardwire cloth is also skirted out at the bottom for protection from predators digging.


Eventually I would like to add electricity to the coop and create a separate area for a brooder and/or ‘hospital area’ where I can nurse sick chickens back to health. I actually wish I had created a special area for this from the beginning.
I also hope to breed and hatch chicks next year.
Many thanks to Nina M. from southern Maryland, USA for sharing her story and photos, used with permission.

This coop is wonderful! The run looks very spacious too. The addition of the Dutch door was a stroke of genius. Very nice
LikeLiked by 1 person