My main coop was built in the fall of 2014. It’s 13’ x 8’, with one half used as a coop and the other for storage, infirmary and broody hens. The sleeping side is not large, but my outdoor space is.


 Broody pen, (R) Main Entrance")
The rule of thumb is to have 2-4 square feet of coop floor space/bird- less for bantams or if you’ve got a large run or they are free-ranging. My coop is situated within a 1200 square feet pen. I have a second 4’ x 8’ coop in an adjoining 500 square feet run. My birds are only in the coop to eat and sleep. In winter, that’s up to 15 hours/day, but in summer only 8 hours/day.
In 2014, I had just over a dozen chickens (including some bantams) and my roost bars were of the plain-Jane variety: two simple, horizontal bars made of dowelling and mounted in metal brackets. They worked just fine until I added a few more birds. One of the issues of expanding your flock is the need to make sure everyone has enough room. Competition for space – whether it’s yard space, nest boxes or roost bars – is stressful and can lead to bullying, pecking and decreased egg production.
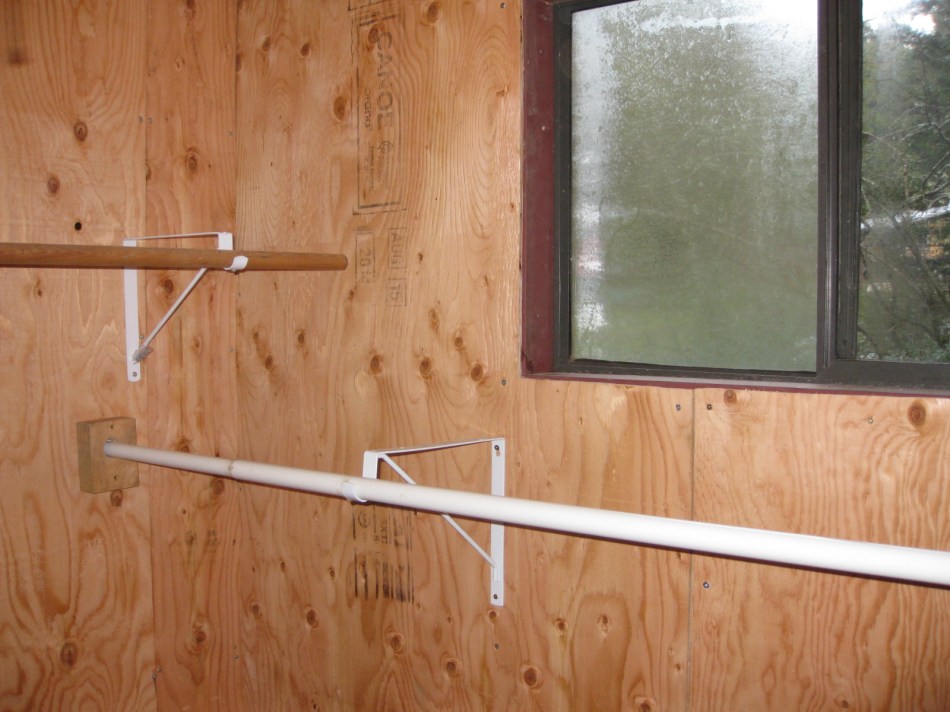
Standard sized chickens require 9” of roost bar space each. As my flock increased I added more roost bars to accommodate them: 1″ x 3″ flat boards affixed to the brackets behind the original dowelling, so there were two parallel bars and then, some tree branches laid on the diagonal between the L, so they formed a triangle.


The next year, I found a baker’s rack in a Starbucks’ dumpster and attached it, horizontally, to the existing bars. It is metal, which wouldn’t be appropriate in colder climates due to the risk of frostbite. It worked fairly well. The downside is I couldn’t reach birds in the back corner, which is problematic if I am trying to treat them for mites or box them up at night for transport. I could reach under there fairly easily for cleaning, but didn’t like risking bending down when they are overhead. I’m not keen at the thought of being pooped on.


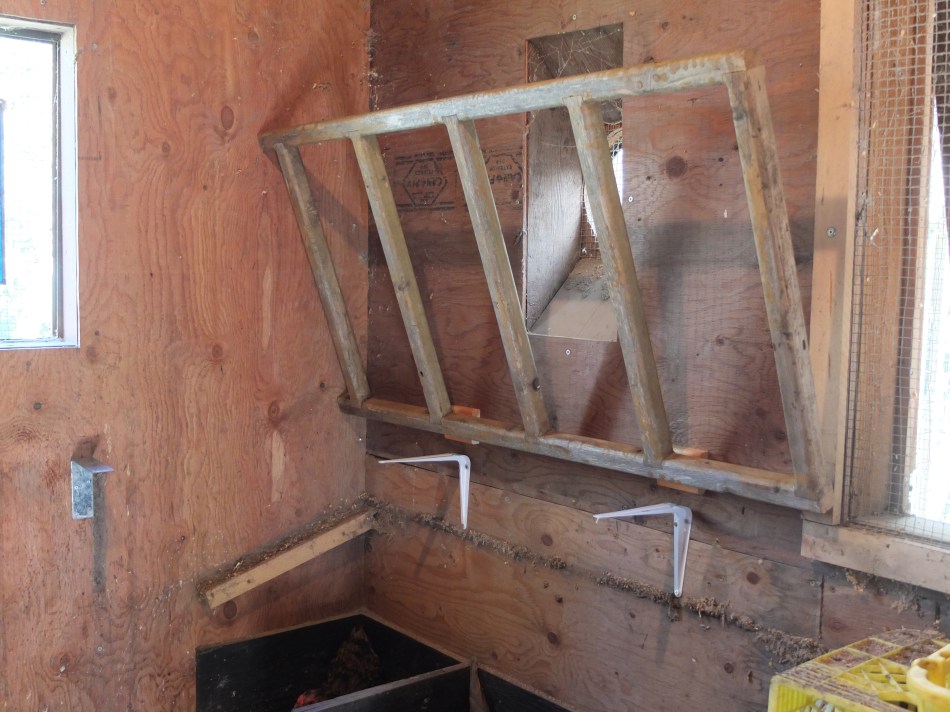
I had been researching the internet for different designs. Should I try the ladder style? It’s appealing because I could maximize roosting space, but as you know chickens have a pecking order and like to sleep at the same level. Who wants to be on the bottom rung? No one – which means more competition for the coveted top bar. And how do you clean under there? It would mean hinging the structure and swinging it up to the ceiling to do my weekly cleaning, which seemed a bit problematic in a small space.
I considered two parallel bars wrapping around two and a half sides of the coop – forming a modified U-shape – with a droppings board underneath. I like the idea of cleaning less poop up off the floor and having my shavings last longer. But the droppings board would have to extend out further than the roost bars to be effective and that wouldn’t leave a whole lot of room for me. Besides there’s a door between the two halves and the board would extend into the opening.
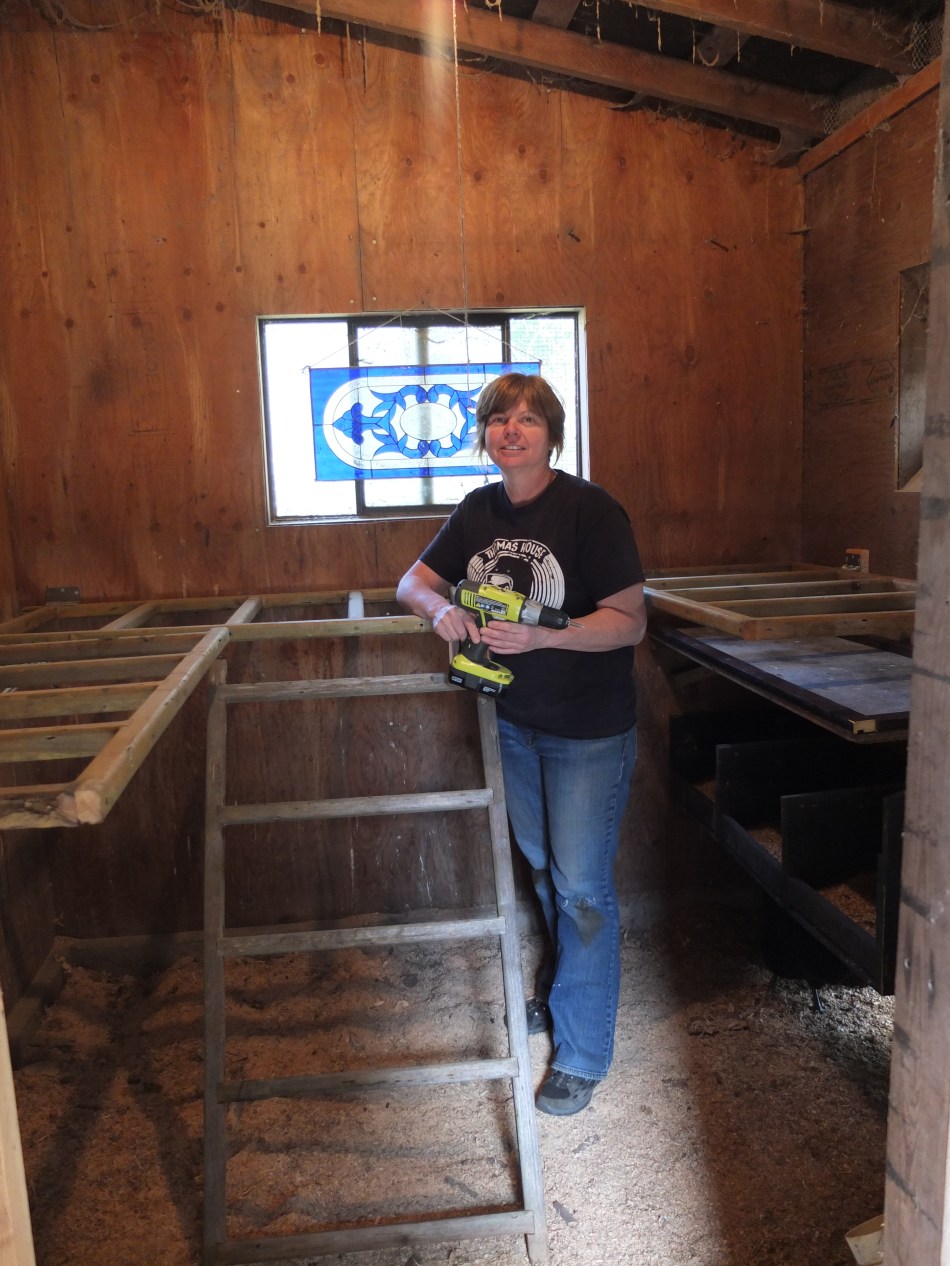
My partner in chicken stuff is Tracy. She helped me on my last coop build so I invited her over with a couple of ideas, but no firm plan in mind. We’re both big fans of freecycle and always challenge ourselves to do things on the cheap. Keeping chickens can get costly, so I try to save money wherever I can. I posted some wanted ads on our local Facebook community bulletin boards and had several offers of building materials. Since I didn’t have a plan, I didn’t know what I might need, so I took a pile of 2”x 2”s, 2”x 4”s and random bits of wood. Whatever I don’t use I store for the next project or pass on to friends.
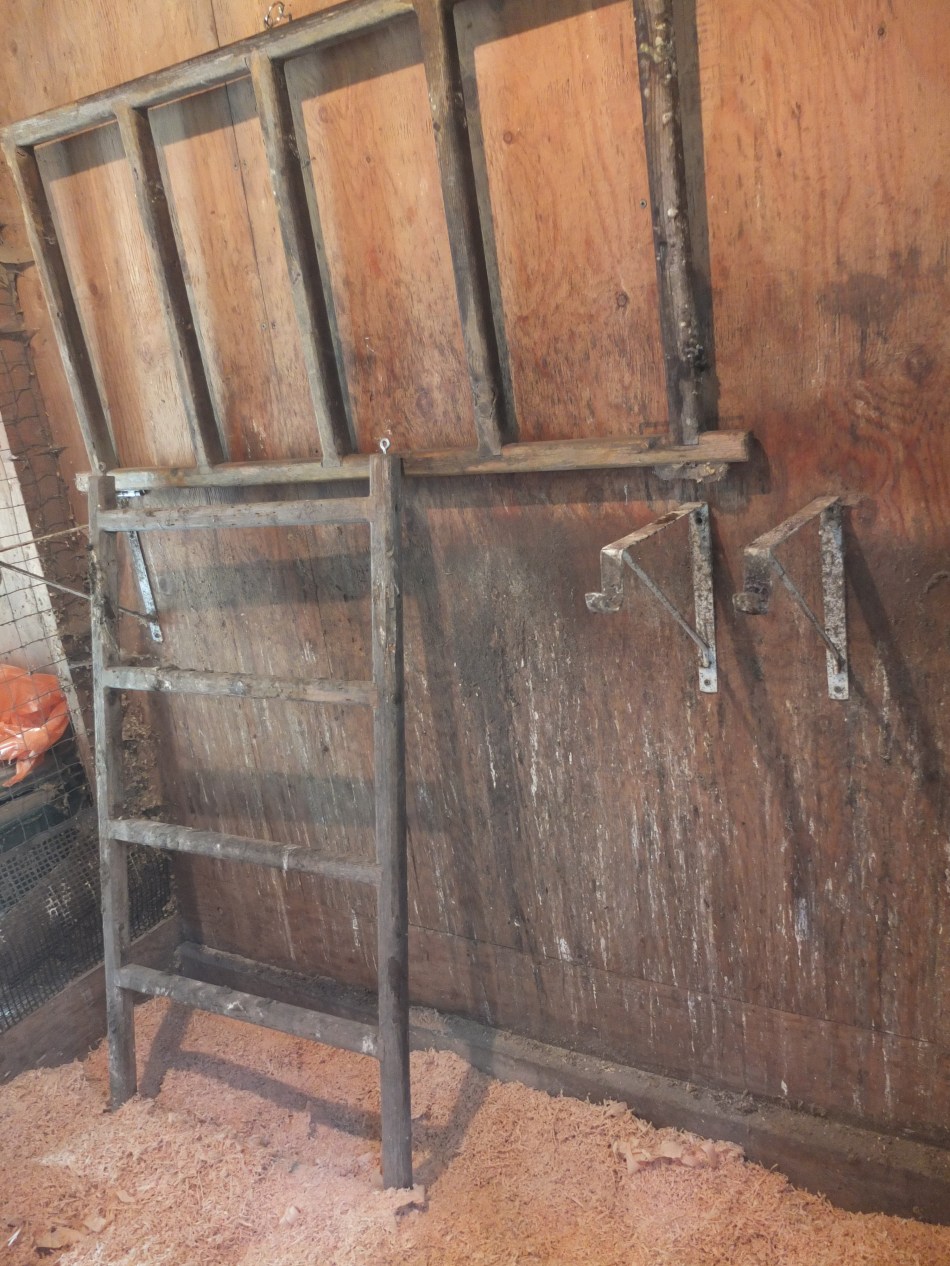
Tracy’s modus operandi is to look over the pile of supplies and hatch a plan from there. My priority was to maximize roost bar space, not obstruct floor space and be easy to clean. She quickly zeroed in on four 24″ x 44″ wooden panels that Anne gave me. Her husband, Steve, made them as supports for tomato plants. Each of the long sides had two screw eyes, which I’m assuming were used to attach them together to form a square or a trellis.
Tracy liked them because they were all matching and when finished would be aesthetically pleasing. Good thing we’re on the same page in that department: just because it’s a chicken coop doesn’t mean it can’t have style.

Turns out two of them – placed in an L-shape, horizontally – fit just perfectly against one wall and across half the second wall. They didn’t obstruct the gate once we changed it to open outward, instead of inward. Tracy mounted the panels using the brackets left from the original bars and hinged them so they could fold up against the wall for easy cleaning.


The third one was used as a ladder, which has screw eyes that clip into hooks and is totally detachable (even one-handed) if I need to remove it for cleaning the coop floor.
The space above the nest boxes seemed like wasted space so I wanted to install more roost bars on top of them. I didn’t want the chickens to poop on top of the nest box lid (plywood covered with linoleum) so here was our opportunity to experiment with making a droppings board.
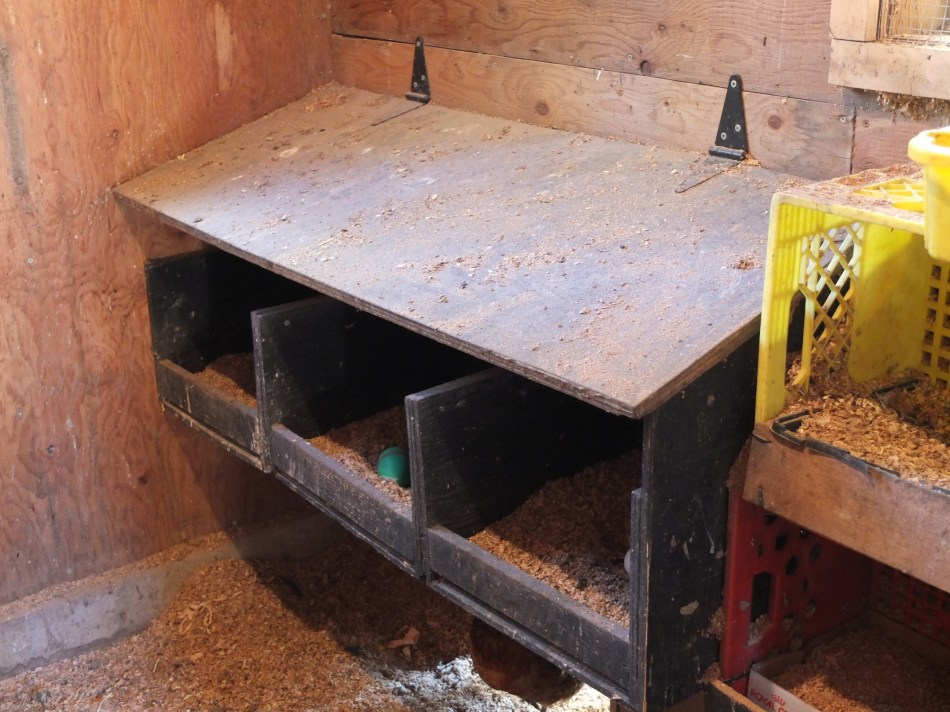
It was pretty simple to make the droppings board by using the existing nest box lid. Tracy removed the lid in order to install a lip. In my scavenger hunt for materials I found a frame that was exactly the width of the lid, but too long. No problem: Tracy cut it to size and screwed it into place.


She then hinged the last wooden panel to the wall just above the nest boxes, with bracket supports on two sides.
Next, the lid was reattached to the wall with the original hinges. We lifted the sloping lid until it was level, then Tracy screwed a block of wood into the wall on the underside to hold it into place. Shelf brackets support the roost bars above it, which are also hinged like the others.


I then added some sand so I can use a litter scoop or tongs to clean the poop that ends up there. It’s not ideal, in that, the lid is narrower than the roost bars, but if the droppings board idea works we can extend it in future. If the trim is too shallow, we can add another layer to accommodate more sand.
I snuck out after dark: everyone was in bed, on the roost bars, and giving me their seal of approval. High fives for Tracy.


The day after the big reveal the nest boxes were full of eggs, so it appears the girls don’t object to their decreased lack of privacy now the sloped lid has been lifted several inches. If that changes, we can add a piece of wood that will make the nest boxes less public.
I love that all the roost bars are hinged and the ladder is detachable, so it’s super easy to clean and access underneath.
Total time: Way longer than you’d think, considering the four main panels were already assembled. Some of the time was spent thinking and then, when it comes to doing, Tracy is a bit of a stickler for details and wants everything to look good. I took a backseat on this project. My main job was staying out of her way, taking photos and running back and forth between my workshop and the coop bringing her supplies: a level, hammer, screws, drill bits and hardware.
The girls were less than impressed the first day: 2 1/2 hours of interlopers in the coop almost sent them packing. By the second day, another 2 1/2 hours, they were more accepting of the intrusion. Check out some of their reactions here.
Total cost: All the wood was free. We reused the five brackets and four hinges I already had. I had to buy two additional shelf brackets and hinges. Tracy’s fee comes in the form of vodka coolers, just one a day to keep her hydrated. She usually refuses offers of stuff in trade, but this time I managed to ply her with lunch.
Stay tuned for more building adventures with Tracy (& me, as sidekick). I don’t have anything on the agenda just yet, but with chickens there’s always the possibility of a new project.

Hi! I’m looking to update my chickens roosting bar and love your idea. What are the dimensions for your hanging roosting bar and how far apart are thr actual roosting bars from each other? Thanks
LikeLike
Luckily all four panels are the same: 44″x24″. The spacing between the bars is 9″. The bars themselves are 1.5″x1.5″ – some folks would say that’s too narrow but it’s never been an issue.
LikeLike